Real Unsharp Masking
The section on basic image sharpening showed how to use Photodesk's built-in unsharp mask facility to enhance a picture of the Moon. Here we'll look in more detail at unsharp masking, and show how to do it 'by hand'. This offers more control and much better quality, but does require extra work and is harder to get right.
The technique can appear almost magical at first. You take a copy of a blurred image, make it much worse, then subtract it from the original. It seems counter-intuitive, but the results can be astonishing.
- Start by getting the original image into Photodesk, and save it as moon in Photoshop format.
- Create a duplicate of the image. Open the main image menu, go to File>Copy, type moonblur in the writeable icon and press return.
- We want to make a reduced-contrast, dimmer and very blurred version of this image. As usual, do the brightness and contrast adjustment first. Ensure the moonblur image has the input focus, and open the Image processing window.
- Select Equalise, open the details pane, and ensure that the type is linear and the channel is RGB.
- Drag the bottom of the right-hand dotted line to the left, until the bottom right number in the "Map" section is about 170:
![[Ip/Jpg]](pix/usm/ip.jpg)
Reducing contrast and brightness
- Apply with Magic wand:Whole image at 100% opacity, and you should see the image get dimmer and 'flatter'. Fix.
- Now for the blurring. Select Special effects>Blur>Gaussian, and set a radius of 6 pixels. Click on Blur, and fix. The image should now look awful, dull and blurred. Fear not!
- Open the main image menu, and select Image>Calculate... (or type Control-U). A daunting-looking window will open.
- Fill in the details as follows:
Function = Subtract
Source 1:Image = "moon", Channel = "#0 RGB"
Source 2:Image = "moonblur", Channel = "#0 RGB"
Destination:Image = "New", Channel = "New"
Offset = 0
Gain = 2.5
![[Calc/Jpg]](pix/usm/calc.jpg)
Combining the two images
- Check it's all correct, and click on Calculate.
- After a brief pause, a new image will appear:
![[Moon1/Jpg]](pix/usm/moon1.jpg)
The Moon, enhanced with 'real' unsharp masking
For comparison, below is the version enhanced with Photodesk's built-in unsharp masking filter, and after that the original, unprocessed image.
![[Pic2/Jpg]](pix/shp/pic2.jpg)
The Moon, enhanced with Photodesk's built-in unsharp masking
![[Pic1/Jpg]](pix/shp/pic1.jpg)
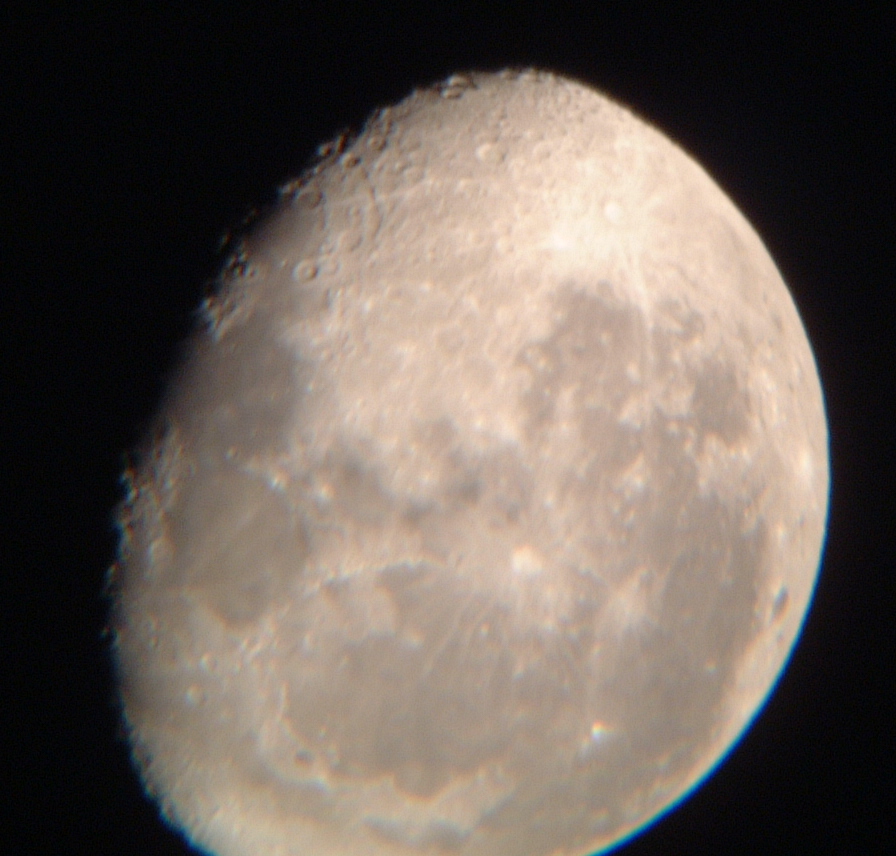
The unprocessed Moon [FinePix 4800Z; 2002:07:29 01:15:21; cropped; 50% scaled]
Notes
- This method of image sharpening originates with 'real' film, as a darkroom technique.
- The various settings are very dependent on the nature of the original image. You will need to try various values out to get the best effect.
- One sign that you've 'overdone it' is the presence of dark halos around bright objects (particularly noticeable in images of stars, for instance).
Feedback
Malcolm Ripley did some experimenting after reading this page, and has some useful advice:
The relation between the equalise adjustment and the gain factor in the calculate step should be :
gain = 255 / (255 - equalise factor)
The higher the equalise factor the greater the sharpening although as it gets "too sharp" it tends towards high contrast edges. Values between 150 - 190 seem to be about right depending on how sharp the original is.
The blur radius can be assessed by magnifying the image and examining a supposed sharp edge. The radius should be set to the approximate width of this edge. The overall sharpening varies very little if the blurring is out by +/- a pixel or so.
